Mid-Side and Blumlein recording with the Zoom H4n

Saturday, March 21st, 2009

I was surprised to find that a Mid-Side decoder function is included in the H4n, this is usually a feature of high end field recorders but it’s easy to do in the digital realm so the Zoom engineers could “throw it in” without much added cost. I love fooling with different mic arrangements so I had to set up a couple of figure 8 mics and do some recordings. (more…)


Building a broadband absorber (on the cheap)

Friday, March 6th, 2009

When I talk about room treatment I only discuss the simple broadband absorber. I’ve read discussions of tuned membrane bass traps, tube traps, and diffusors, but my approach so far has been guided by the slogan, “You can never have too many broadband absorbers in a small room.”

As I mentioned in a previous post, my construction method for broadband absorber panels is cheap and simple. I use no frame or other hardware, but simply wrap two sheets of OC703 in burlap, like wrapping a package, and fasten the fabric with glue. (more…)


13 Broadband Absorbers

Monday, February 23rd, 2009

I built a batch of broadband absorber panels before I recorded my Kaleponi CD. I have 13 panels constructed of 4 inches of OC703 wrapped in burlap. It’s been a while since I built these and I’ve lost track of the cost, but I’ll do better with the next batch, I promise. Here’s a look at what they’ve done for my recording space. (more…)


Acoustic Treatment – here’s what we’re trying to fix

Thursday, February 19th, 2009

Room EQ Wizard is a wonderful free tool for evaluating the acoustic conditions in a room. And Sketchup is a wonderful free tool for modeling a room. I used both of these to evaluate my recording space, and to develop a baseline for comparison as I add treatment. (more…)


Installing an end pin jack

Wednesday, February 18th, 2009

I love the clean, natural sound of an acoustic guitar, but when it’s time to play for a room full of people in a coffee shop, restaurant, or club a pickup inside the guitar comes in mighty handy. There are several different styles of pickups, but they all need a jack so they can be connected to an amp. And installing that jack is a lot easier with a couple of tricks.

(more…)


Room EQ Wizard – free room evaluation software

Friday, February 13th, 2009

During the learning process that was my first CD I found Ethan Winer and learned a bit about his ideas for improving the acoustics of small rooms. Since then I’ve learned about the Acoustics forum at StudioTips.com, another great source of information on small room acoustics.

Even though it’s not strictly necessary, it’s interesting to use some kind of acoustic measuring tool to evaluate the room and gauge the results of treatment. I recently learned of a free program that works with a PC or Mac and their audio systems to measure and display room response. It’s called Room EQ Wizard and it’s available for download at the Home Theater Shack. The Shack is a discussion forum focusing on home theater (well, duh), but Room EQ Wizard, or REW as they call it, is just as useful for recording spaces as it is for home theater.

The home theater users seem to have systems that are a bit more complex than my simple recording rig. I don’t have a subwoofer and accompanying crossover, nor do I have an equalizer in my playback chain. So my connections were simpler than those illustrated in the REW help pages.

I bought one extra piece of equipment for this project, a Sound Pressure Level (SPL) meter. These are available from Radio Shack and other sources. The Radio Shack unit I bought is accurate enough to measure a baseline volume setting for all my readings. It’s possible to use the SPL meter as the measurement mic, but it is not accurate above about 3Khz, fine for tuning subwoofers but not much help for a full range monitor system. The Behringer ECM8000 is widely recommended for an inexpensive measurement mic, but I have a couple of DPA 4061 miniature omni mics in my collection, so I chose that for my measurement mic.

The first step in using REW is a soundcard calibration procedure. This procedure compensates for nonlinearities in the soundcard and also ensures that the basic system is working, with REW finding the soundcard inputs and outputs as needed.

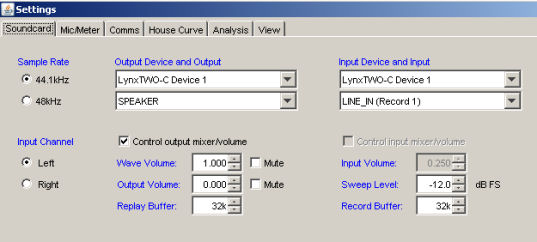
I use a LynxTwo-C soundcard and REW found it easily. Here’s the Settings page where the soundcard is configured and measured.

settings-soundcard

The soundcard calibration starts by creating a loopback connection, that is, the output of the audio interface is connected to the input. This is easy with a recording oriented system, where balanced line in and line out connectors should be available. On the Lynx breakout cable the XLRs just clicked into place. On other systems a male TRS to male TRS may be needed. Don’t forget to turn off your power amp or mute your speakers – now how would I know to remind you about that??

I’ve created a YouTube account for videos related to the blog. You might stop by http://www.youtube.com/user/homebrewedmusic if you’re in the neighborhood. This video goes through the steps to run the calibration measurement.

After saving the soundcard calibration file we need to adjust the levels so we’re getting a good signal to noise ratio but avoiding clipping. First we restore the loopback connection to our normal hookup and turn on our power amp or unmute our speakers.

This video demonstrates the steps:

Since we’re moving these input and output volumes all the time we’ll probably need to run this level adjustment routine before taking measurements.

With the levels set we’re ready to measure our room/speaker response. Well, actually we’re also including the mic preamp and power amp, but those are probably quite linear, especially compared to our room and speakers.

Here’s a screen video of the measurement process.

And here’s the resulting graph. Looks pretty ragged to me, with huge swings between 40 hz and 200 hz, and lots of comb filtering in the higher frequencies. I suspect that this is the normal response of a medium small room. In our next entry we’ll see what we can accomplish with our current batch of broadband absorbers.


G Natural – Saving User Settings

Tuesday, December 11th, 2007

I ran into a little problem when I upgraded the software in my G Natural to the 1.03 release. I have to confess that I didn’t check the status of my user patches before installed the software, but after I finished the upgrade my patches were gone. I contacted TC support and they told me that the upgrade should not wipe out the user patches, so I suppose I did something else wrong, it certainly wouldn’t be the first time. But at least one other user on the TC G Natural support forum said he had the same problem.

I asked TC if they could offer a suggestion for saving my user patches, and they pointed me to Midi-Ox as a tool that can capture and restore MIDI information. Since I’m nearly totally ignorant of MIDI, I ran into a few issues but I’ve now succeeded so I thought I’d share what I’ve learned.

Hardware

The hardware you’ll need are a MIDI port on your computer (actually two of them, one for input and one for output) and one or two MIDI cables. Connect the computer MIDI OUT to the G Natural MIDI IN, connect the computer MIDI IN to the G Natural MIDI OUT.

Software

Download and install the MIDI-OX software on your computer.

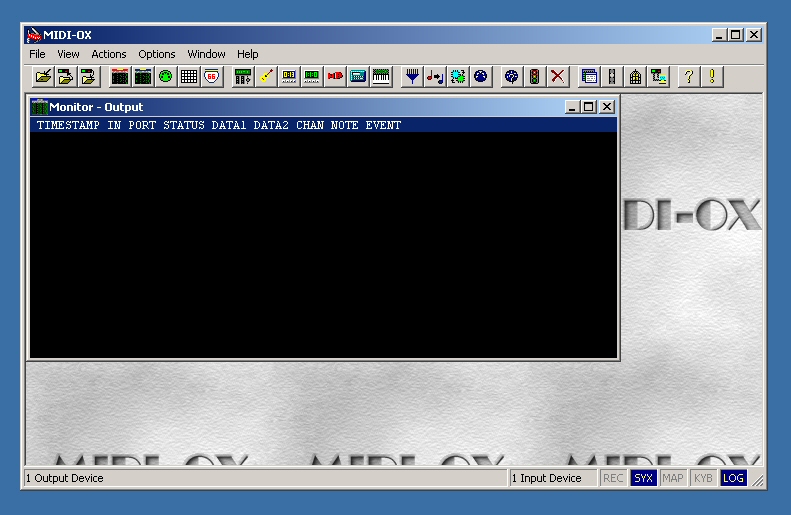
Start the MIDO-OX software, you should see a screen something like this:
Select Options | MIDI Devices… and you should see this, but with your own set of available devices:
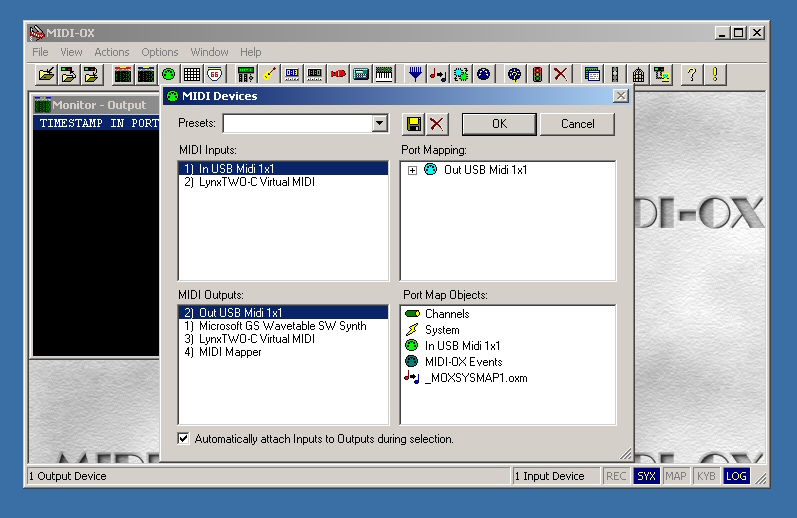
Click and highlight the input and output MIDI devices you hooked to your G Natural earlier. Click OK.

G Natural

Here we come to a possible gotcha of the first order. The 1.03 software update is advertised to enable MIDI functions. This makes sense because these functions are not yet documented in the latest manual on the TC site. So I suppose users who want to save their settings before upgrading to software version 1.03 are just out of luck. Oops. Still, once you have 1.03 installed, you’ll have a way to save settings in the future.

You get to MIDI functions by starting with the Menu button. Using the Edit D knob, scroll to the MIDI selection, then press Menu again to activate the MIDI menu.

Again using the Edit D knob, scroll to PrgChg.In: and make sure it’s set to Off. If it’s On, use Edit A, B, or C to change the value to Off.

Scroll with Edit D to PrgChg.Out: and once again make sure it’s Off.

Now scroll with Edit D to Dump System (for system wide settings) or Dump Bank (for user patches).

MIDI-OX

The particular corner of the MIDI world we’re using is called SysEx. This stands for System Exclusive, and it seems to be a method for storing and retrieving configuration information via MIDI. If you’re really curious. I’m sure there are lots of great tutorials out there in webland. Regardless, we can use MIDI-OX to capture a SysEx dump from the G Natural, save it to a file, and send the dump back to the G Natch.

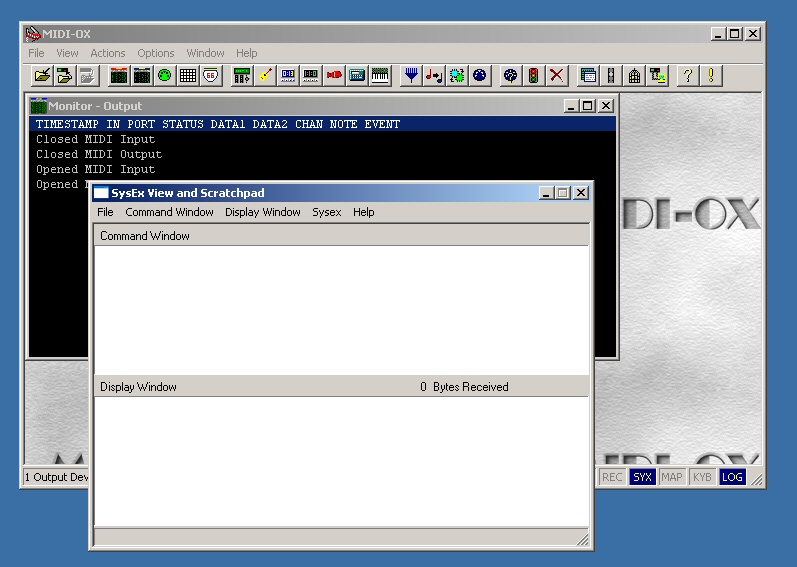
In MIDI-OX, click View | SysEx… and you should see this:
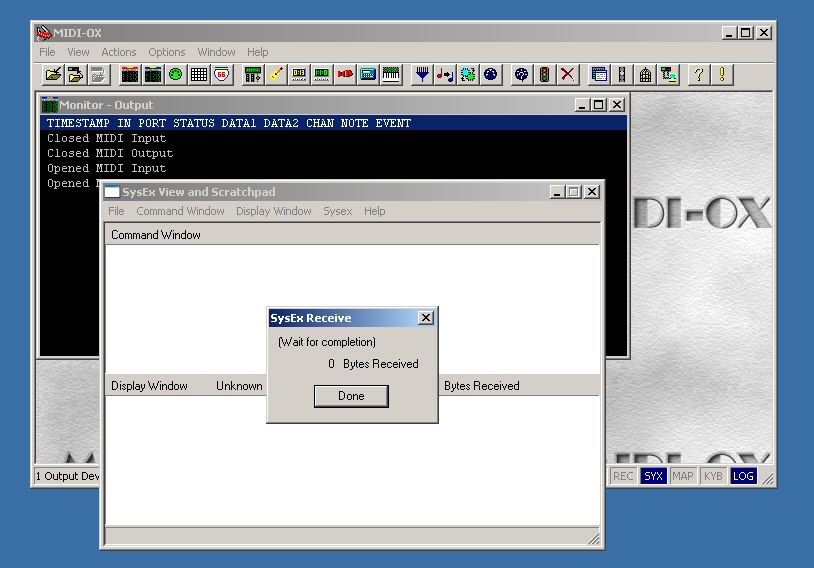
In the SysEx View and Scratchpad window, click Sysex | Receive Manual Dump… and you’ll see this:
G Natural

Press the Menu button on the G Natural and you’ll see a message telling you the dump is taking place.

MIDI-OX

You’ll see a byte count in the Sysex Receive message box. Press the Done button and you can view the results of the SysEx dump. The lower Display Window now contains the data from your G Natural, displayed in Hexadecimal format.

Click Display Window | Save As… to save the SysEx dump to a file of your choice.

Restoring Saved Settings

To restore your settings, simply activate the SysEx window and click File | Send Sysex file… and navigate to the file you saved in the previous step. You don’t have to take any action on the G Natural except to have it turned on and connected to your MIDI port.

In Conclusion

Hopefully this writeup will help other G Natural users. Even though I still enjoy the great sounds and control provided by the G Natural, I’m a little disappointed that I had to figure this procedure out on my own, and gather the tools myself. I’m also disappointed that an update to the manual has not been provided to go along with the software update. We’re once again operating our machines without accurate documentation. And finally, I expected to have a computer based patch editor available when I bought the G Natural. I had one with my much less expensive Yamaha MagicStomp, so I’m really unpleasantly surprised to find that TC Electronics does not provide one. A proper editor would make saving and restoring settings a snap, and make creating and configuring patches a lot easier as well.

TC Electronics has setup a forum area where we can share experiences and possibly encourage TC to expedite updates to the documentation and to provide a patch editor. I hope to see you there.


The $4.00 Digital Studio

Tuesday, February 13th, 2007

On the acoustic guitar forums I visit, one common question goes something like:

How do I record my guitar so I can judge my progress (or lay down a rhythm track or even make a CD just for family and friends). I have a pickup in the guitar, I don’t need great quality, and I don’t want to spend a lot.

Since this person is posting on an internet forum, I will assume they have a computer. If it’s a PC type, it almost certainly has some kind of built-in soundcard, with at least a mic input. So all we need to do is hook the guitar pickup to that mic input and use some sort of program to capture that input and save it to a file. It just so happens that there are some very effective recording programs available to download for free, so that leaves as our only problem some way to connect the guitar pickup to the mic input. And here it is:

This is a 1/4″ phone female to 1/8″ mini male adapter. A normal guitar cable like the one just above the adapter in this picture (male 1/4″ phone plugs at both ends) fits into the hollow side. The pointed side plugs into the mic input of the computer. It costs about $4.00 at any store or web site that sells electronic geegaws (like Radio Shack). This is all you need to connect your pickup to your computer (assuming you have a guitar cable).

Now, on the software side what are the options? Unfortunately, the built-in Windows Sound Recorder is not very useful. It’s limited to about 1 minute of continuous recording without intervention. There are not effects or editing features, no click track or metronome, no metering, and certainly no multitrack overdubbing and mixing.

The easiest free program I’ve found is Audacity – it’s a little clunky but it is full featured. It includes plenty of editing capability and built-in effects, and you can save your recordings to various formats like .wav for burning to CD and (with some free extra software) to .mp3 for your portable music player or web site. I’ve used this little adapter and Audacity to record new song ideas on our laptop when we’re traveling. I’ve also used it to create practice loops when I’m trying to nail a tough section of a new song. Compared to a decent microphone, preamp, and audio interface these recordings are fuzzy, noisy, and crude, but they do the job, and the price is definitely right.

Here’s one verse of an old Hawaiian song, “No Ke Ano Ahiahi,” recorded as a solo guitar instrumental using the the 1/8″ mini plug adapter and Audacity.

And here’s the same track with some reverb added.

Obviously these are not “major label quality” recordings by a long shot. The direct output from a pickup is not very close to the natural acoustic sound of your guitar. But we’ve looked at a tool that can help get your pickup based recordings much closer to a natural acoustic sound in a previous blog entry: “Better EQ Through Software”. And, as we stated at the beginning of this entry, the whole purpose of using this simple, cheap adapter is to get simple, cheap recordings, not Grammy awards.


About the Blog

    Howdy, my name is Fran Guidry and this is my Homebrewed Music blog.

    I play Hawaiian slack key guitar and recorded my solo acoustic CD at home. Most of the recording information I find on the internet seems focused on bands, drums, multitracking, and so on but my main focus is recording solo acoustic guitar. Lately I’ve been enjoying video recording along with audio, so that shows up in the blog as well.

    I’m also a guitar nut. I love big ones and little ones, handmades and factory guitars, cheap ones and expensive ones. So I’ll be sharing the fun of exploring guitars as well, along with the challenges of amplifying acoustic guitars for live performance.

    Welcome!

Philosophy

    My recording philosophy is pragmatic, skeptical, not super critical. After all, the performance is by far the most important component of a track, and every aspect of any recording is a matter of taste.

    But I do like to know “about stuff.” Back in hifi days I learned about double blind testing. I learned that we humans can easily hear differences that don’t really exist. The more I’ve learned about our human auditory system, the more I’m skeptical of what people say they hear, especially if they claim that a particular microphone or preamp or cable has some magical property.

    I’ve only been recording since 2001, and when I started I found the usual places on the internet. I sought advice and accepted it, thought I would improve my recordings by using more expensive equipment. It didn’t work.

    Two things that did seem to lead to better recordings were experience and room treatment. Getting an appealing sound is the combination of many small details, and learning those details only comes from experience. Amd the sound of the recording space is obviously a big factor.

    I’ve only recorded seriously using digital technology, but I remember trying to record rehearsals and gigs back in analog days. I don’t have any nostalgia for analog recording and playback systems at all. I think even low end digital systems can capture marvelous recordings. So when I look at gear, I look for good specs: low noise, broad flat frequency response, wide dynamic range, low distortion. I’m not interested in colorful components, mics and preamps with a sound, I want the sound to be the sound of my guitar.

    But the last word is that I’m just learning and I hope you find something useful in my posts.