13 Broadband Absorbers
I built a batch of broadband absorber panels before I recorded my Kaleponi CD. I have 13 panels constructed of 4 inches of OC703 wrapped in burlap. It’s been a while since I built these and I’ve lost track of the cost, but I’ll do better with the next batch, I promise. Here’s a look at what they’ve done for my recording space.
My panel construction is crude compared to a lot of examples I see. I use no frame, relying on the rigidity of the compressed fiberglass to hold itself up. I simply glue together two 2″ panels and fold the burlap around them, then shoot the burlap with glue and hope they hold. They’re not very rugged, not terribly pretty, but they hold together well enough for my needs, they’re easy to maneuver, and do a nice job of improving the sound of the room.
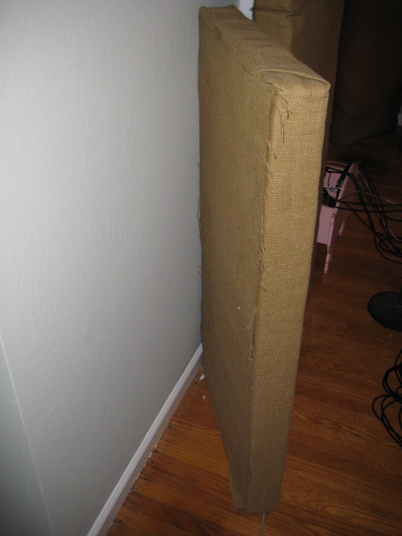
Broadband absorber, quick and dirty style
Hardware Free Mounting
I’m lucky to have 8′ ceilings in my recording space, so the 4’x2′ dimension of the OC703 works great. I can easily shove two panels into a corner and they’ll hold themselves in place. I can place two of them on a wall with a 4″ spacer (like a small cardboard box) behind them and they’ll wedge into the space and stay there.
Here’s a model of Digital Duck Studio with 13 panels installed.
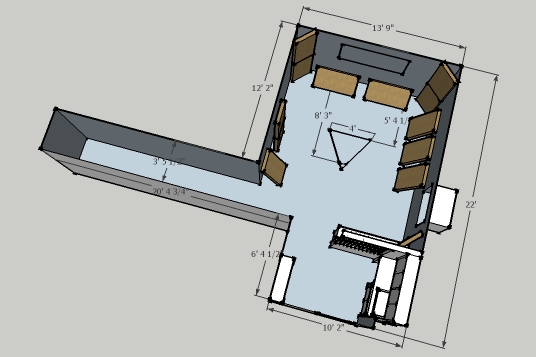
Digital Duck Studio with 13 broadband absorbers installed
and a picture of the business end of the listening setup.
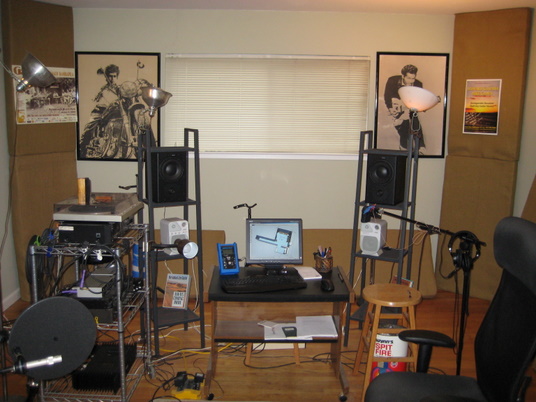
Digital Duck listening position with broadband absorbers
My layout simply follows the advice given so generously by Ethan Winer, concentrating on the corners. The two forward corners are the easy ones, every other vertical corner in the room has some obstruction. The floor to wall corner is the next easy one to cover. The forward traps are out of the way, so I angle them out a bit, nearly 45 degrees straddling the right angle. On the side walls, where space is more valuable and also where we need mid and high damping, I stand the panels up and lean them against the wall at a small angle. They’re tall enough to cover the first reflection points on the side walls, and since they’re not fastened, they’re easy to move if needed.
On the left I have a pair of panels spaced 4″ from the wall, once again following Mr. Winer’s advice.
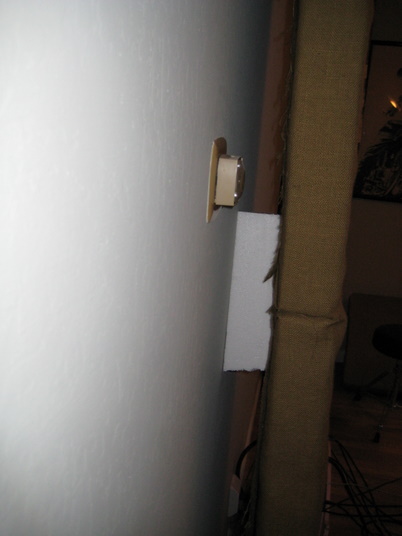
Mounting of two broadband absorbers using a spacer
These two panels are self-supporting by being wedged against a spacer, a conveniently sized piece of styrofoam. Once again, this arrangement can be altered in minutes.
Room Testing with Room EQ Wizard
Now lets fire up Room EQ Wizard and see if we can measure any improvement with 13 panels. Here are three measurements taken at three different locations, just as we did in the previous post. The first measurement is light blue, taken at the listening position. The second, green, has the mic moved back 1 foot. The third purple graph was taken another foot back.
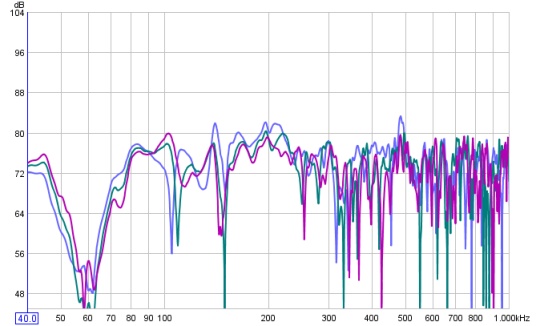
Three frequency response plots - 40 to 1000 hz
and for comparison here’s the graph from the untreated room:
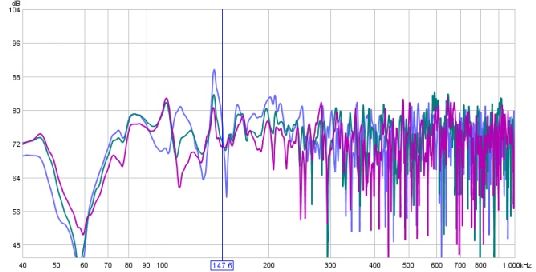
REW graph 40 to 1000 hz, 3 measurements combined
I’m pleased with the this graph in the area between 100 and 200 hz. In the untreated room measured in our last blog entry each measurement showed a distinctly different dip, right in the low strings of the guitar. The new measurements with the treatment in place may not be flat, but they’re much more consistent between positions which makes getting a good recording a lot less of a headache.
And speaking of recording, here’s a clip with the same mic layout we used in the untreated room.
[audio:post2clip1.mp3]or if your prefer, download the clip
Here’s the clip from the last post, in the untreated room.
[audio:post1clip1.mp3]or if your prefer, download the clip
To my ear this new clip in the treated room has a tighter stereo image and sounds much more like a studio recording. This recording shows how much the broadband absorbers do to control the early reflections that make a small room sound “cheap” and tinny.
Well, if a little is good, then more is better, and too much is just enough. In the next stage of the panel project I’ll buy some more compressed fiberglass and some more burlap and make a few more panels to try to improve the room a bit more.
This entry was posted on Monday, February 23rd, 2009 at 1:59 pm and is filed under Acoustics, Tutorials. You can follow any responses to this entry through the RSS 2.0 feed. You can leave a response, or trackback from your own site.
Lynn said in post # 1,
on February 27th, 2009 at 12:38 pm
Wow, I didn’t realize how easy room treatment could be.
Thanks,
Lynn
Victor said in post # 2,
on June 17th, 2009 at 10:02 am
consider moving your listening triangle closer to the front wall, maybe it’ll flatten the deep null at 60Hz.
You’re on the right track!
Jeremy said in post # 3,
on October 31st, 2012 at 1:08 am
I have built 21 Panles EXACTLY like yours and am now discouraged, thinking I should have thought out the mounting a little better. I cannot use glue, nor find nails that are long enough to go through the panels and the wall, and I really do not want to put holes in my panels.
I see that you effectively mounted your panels, but with just the one picture and brief description, I do not understand how you did this. Would you please explain in depth how you mounted your panels?
Fran Guidry said in post # 4,
on October 31st, 2012 at 10:18 am
Jeremy, I’m away from home right now so I can’t take pictures, but when I do get home I’ll add that to my list of videos. I used several mounting techniques.
Since my ceilings are 8 feet, two panels can be pressed into the corners and they will stay there with no mounting at all. By putting spacers behind them (because they work better a few inches from the wall) I can place two panels on any wall, one above the other, with no mounting.
I have a number of panels that I simply lean against the wall. This lets me position them as needed when I record in different positions in the room, and I also use these propped up behind the mics to make zones of reduced reflection, as described here: http://www.homebrewedmusic.com/2011/12/11/just-two-broadband-panels/
The panels mounted on the ceiling are held up by heavy twine, fed through hooks screwed into the ceiling studs. Once again, the panels are placed about 4″ from the ceiling because this space improves the low frequency absorption. I think these ceiling panels are very important for improving the sound of the space.
Finally, the panels along the wall to ceiling corners are also tied in place with hooks and twine.
I hope this information helps you.
Fran
Igor K said in post # 5,
on April 10th, 2018 at 11:31 am
Fran,
Yes, you are on the right track and so is Ethan W, I’ve met the gentleman at a hi-end audio show years ago, helpful fellow well known to the audiophile community. I’ve been doing acoustics and custom acoustic panels since the mid 80’s and certainly am aware of the tricks and would like to suggest a simple inexpensive one you can try. Fiberglass panels are a cheap broadband solution that has two disadvantages that can be remediated fairly easily. One is that it can shed small bits even in the bonded form you use, and worse with softer, fluffier formulations and this will make its way through your burlap or anything else acoustically useful, after some handling, and that is not a healthy thing to have in your environment. The other thing should be of more interest to you – even fiberglass will, as the frequency goes up, reflect the the top end some above a point dictated by the materials and thickness used. Your bonded form will do this at a lower frequency than softer formulations, BTW. To make these panels even more effective you can wrap them in softer, fluffier simple Dacron polyester fiber-fluff, the sort available in any millinery/sewing shop and even the larger Wal-Marts with a sewing department. This will also act as a physical filter to catch the fiberglass bits and seal them in. The Dacron/Polyester” fiberfill” I’m talking about comes under many names but is the “pillow stuffing” white stuff you see in quilts, pillows, inside jackets, etc, and comes in amorphous and bonded types (that look like a sheet) and it’s the bonded type you want for this.
By providing a softer, fluffier acoustical interface between the sound source and the denser f-glass you extend the absorption range higher into the treble’s top end. As little as the 1/4″ thickness helps (just) a bit but I would recommend at least the (nominal – try measuring the thickness of a fluff!) 1/2″ thickness. Just wrap the f-glass and glue, same as you do the burlap – which should now be wrapped loosely across at least the front and back of the panel to keep from compressing the fluff into uselessness. Or, for the way you are using these panels, you might consider cutting the Dacron to the shape of the large faces and gluing these on before wrapping so the outer edges remain square and flat instead of rounded off. Glue the burlap around the edges. A bit more work but not a lot and the time is yours and doesn’t cost you.
If you like this after you try it, and wish to upgrade the rest of your panels, you can do this right over the existing burlap and then just re-wrap to make the conversion easier so you don’t have to try stripping the burlap off (forget it – you’ll tear the fiberglass up). You should find that messy hash at the top end of your response graphs reduced (with the effect diminishing as the frequency goes up – but the thicker the fluff, the higher up the effect will go). I hope you find this useful.
As for your use of two panels behind your mics, yes that certainly works. I hit on the other end of that idea in the early 80’s (when I used to sell custom panels back when little was available on the market other than black Sonex and Soundex that no wife or significant other wanted in the living room), when treating a room in a temporary situation that wasn’t practical for listening to speakers or monitoring. Or if a housewife not interested in audio wouldn’t allow conventional treatments on “her” walls (somehow a house is never “the husband’s” even if he’s paying the mortgage…). I made panels wrapped in acoustically open fabrics the buyer (and wife…) would choose from samples shown or chosen from elsewhere by the buyers, like art prints on fabrics. Those could go on the walls, permanently, or be movable. But for the movable “vees” I made 4 largish panels in frames with connection clips on one edge (mostly with plain inexpensive black fabric). These would stand behind the speakers in a “vee” much like you show behind the mics in one of your vids to reduce the back and side reflections of the room (and some of the ceiling behind if tall enough or placed high enough) from the speakers in lieu of treating the walls. When not needed, they would store away in a closet in a living situation so the partner could be accommodated or be carted away after monitoring and on to the next use. I even still have one set of these originals left and still in use, albeit no longer portable as part of my listening room now, after all these 35+ years on. Got great service out of them!
Igor
Fran Guidry said in post # 6,
on April 10th, 2018 at 3:43 pm
Thanks very much for sharing your ideas and experiences.
It’s my understanding that health issues with fiberglass are actually minimal, but I understand that its reputation is permanently damaged. Sorta like corn syrup.
In any case, the idea of a softer outer layer and extended high frequency attenuation certainly makes sense.
Thanks again,
Fran